Articles and Information
|
What does a Flat Field do to a CCD image.
It attempts to correct for problems that cause uneven intensity values to be recorded. Pixels all differ a certain amount in how sensitive they are to light so one pixel will look darker than it's neighbor and another pixel will look lighter even though the same amount of light hits all three. This looks like noise when an image is stretched enough.
|
Because a flat field is supposed to be evenly illuminated across the field, it also records exactly the same sensitivity errors and can be used to correct an image by applying a reverse error to it. What the flat field correction attempts to do is produce an equation that will lower the hotter pixels and raise the colder pixels to make it as though they all recorded with exactly the same sensitivity.
In the flat field correction each pixel in the flat field image is divided by it's corresponding pixel in the image. Then it is multiplied by the average intensity of the flat field to bring it back up near where it was (normalize it). This smoothes the image out an image that is greatly stretched. Beside the uneven sensitivity of pixels, flat fields also help correct for dust donuts and vignetting.
To take a flat field all you need to do is to expose the CCD with white diffused light. Many people use the light before sunrise or after sunset and this is the best way to do a flat field.
You only need to do one flat field per night as long as the camera is not removed or rotated.
Since white is required to do a flat field, this can be hard to do at a star party with others around. White light can destroy someone's night vision. I have created a device that allows me to take a flat field in the middle of the night without disturbing someone else.
I cover the front of my telescope with a white silk shower cap and then put a dew shield over that. The shield will keep the white light from spreading. I hang a flashlight which has two layers of a white trash bag over the front of it. The layers help disuse the light. Once in place, I turn on the flash light and take the flat field image. The exposure for the flat field should be long enough to register about 20,000 but your camera may vary.
I have used this device at the Texas Star Party and Okie-Tex Star Party in the middle of the night and no one even knew I was doing a flat field.
|
|
|
|
|
This is my flat field tools I used to create
Flat Field's during the night.
|
|
You should be able to find this flashlight at an local camping or hardware store.
|
|
|
|
|
|
First I place the white shower cap over the telescope.
|
|
Using 2 flat sticks I wrapped Duck tape around them and the flashlight to hold into place.
|
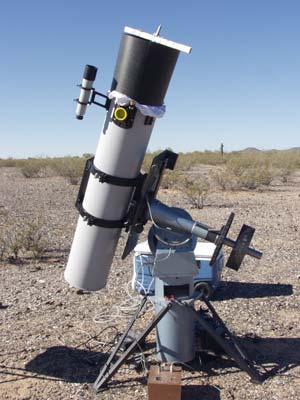
The step is to put the Dew sheild over the scope and lower the flashlight into place. Then turn it on. The dew sheild also acts as a distance tool to keep the light source further away.
|
|
|
|
|
CCD Light Box for a Flat Field (Refractor Style)
How I built a light box for a small refractor to do flat fields without shining white light during a star party.
Light Box built by Dean Salman
Electrical part by Andrew Cooper
|
|
How I built a light box for a small refractor to do flat fields without shining white light during a star party.
In CCD Imaging, taking a flat field is a must to get those clean images. Also, you need to take a flat field for each filter you use during an image. Flat fields take out vinyetting, dust donuts and defects in the CCD Camera. Also, the flat field needs to be taken in the position that you took the image. Once the CCD is rotated in another position, everything is changed. To take a flat field, you must take an image of a white area using white light. During a star party, this is usually not a good idea. Therefore, a lightproof box is needed.
I built my light box after searching the Internet and reading how others built theirs. Gathering all the information, I came up with the design I am going to discuss. This light box is really designed for small refractors such as the one I have: the TeleVue 76.
Part 1
I picked up a small sheet of white marker board that was 1/8 of an inch thick. I picked this material because I wanted a lightweight box that was sturdy. The TV 76 built in dew shield is around 3 ½ inches in diameter, so I cut two 4 ½ squares using a scroll saw. These two squares will be the end pieces for the light box. I took the refractor and put the dew shield on top of one of the squares. I then used a pencil to outline the circle I needed to cut. Once that was done, I used a large drill to make a hole and cut out the 3 ½ circle needed to slip the box over the dew shield of the refractor.
I decided to make the length of the box 6 inches which is twice the diameter of the objective, something I found while searching the Internet. However, with the dew shield, this turned out to be about 8 inches from the lens. My goal was to get some depth needed to make a good flat field. I cut four pieces needed to make up the body for the light box.
Part 2
I first glued two of the 6-inch pieces to the 4 ½ square that did not have the hole in the middle. The glue I used is called DevCon 5 which sets in 5 minutes. I picked this glue because I did not want the pieces to move while the glue was setting. White glue tends to take time. DevCon 5 can be found at any hobby shop and is usually used to build remote controlled airplanes and cars. After waiting a few hours for the glue to dry, I attached the 3rd 6-inch side to the light box.
Because the coating on the white marker board was glossy, I did not want strange reflections inside the box when the lights were on. So I took a sheet of velum paper and glued it to that white side of the marker board. I used a glue stick to hold the paper in place so that the glue would not be seen.
Part 3
The lights I used were LED lights. These tend to use less power and distribute the light more evenly. Four white lights were used, one in each corner of the box. The lights were connected in a series. Each LED takes 1.5 volts, so a resister was used to make up the difference of the power supplied. You can use a 6-volt battery to avoid the resister, but I did not want to deal with small batteries and use the 12-volt that is running the telescope. Also added was small plug-in jack so there would not be a loose wire hanging off the box when it was not in use. To mount the LED in the corner of the box, a plastic wire clip was used to make the LED point up to the end of the box. Also, to help distribute the light, each LED was sanded down so that it was flat. The wire used to go from the box to the battery can be a simple connection. I decided to connect the light box to a small box I made to run my dew heaters. This box has four plugs that output 12 volts and one plug with a rheostat. So the light box connects to the plug with the rheostat and allows me to increase or decrease the voltage thus adjusting the about of light in the box. This way, I can take the exposures I feel are needed to get a good flat field, anything more than 5 seconds but less than 10.
Part 4
Once the wiring was in place, it was time to test out the light box. So I slipped a shower cap over the refractor (I will explain later about the shower cap) and put the light box in place. The flat field looked great with a 5 second exposure using the ST-10 XME CCD. Now that this was done, I glued the last 6-inch piece in place to complete the construction of the box.
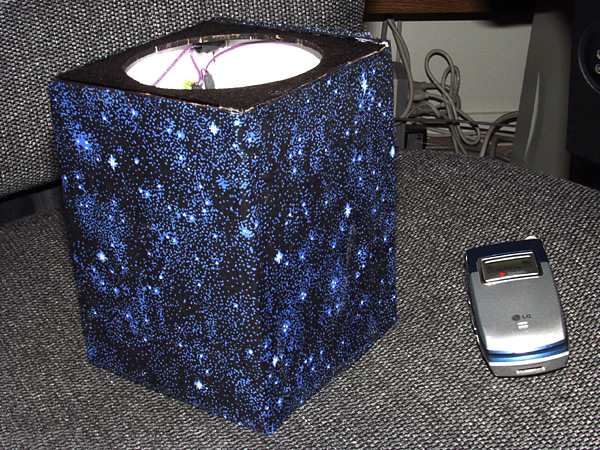
Part 5
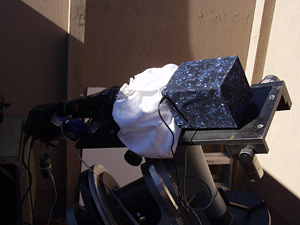
The final step to making this box light proof is to wrap some dark material around it. My wife had such material and cut what was needed to do the job. To glue the material onto the box, she used a hot glue gun, but you can used fabric glue or any other glue that will adhere it to the box. This light box is lightweight and easy to use. When I need a flat field during a star party, I slip a white shower cap over the objective. This helps defuse the light coming into the objective. Then just slip the light box on top. The shower cap helps hold the box in place. Once the box is on, no one knows you are even doing a flat field. To help protect the light box and keep the inside clean, I store mine in a cardboard box when not in use.
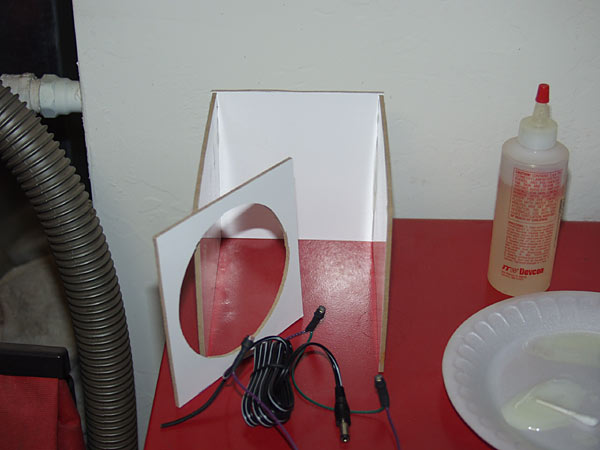
Initial Construction
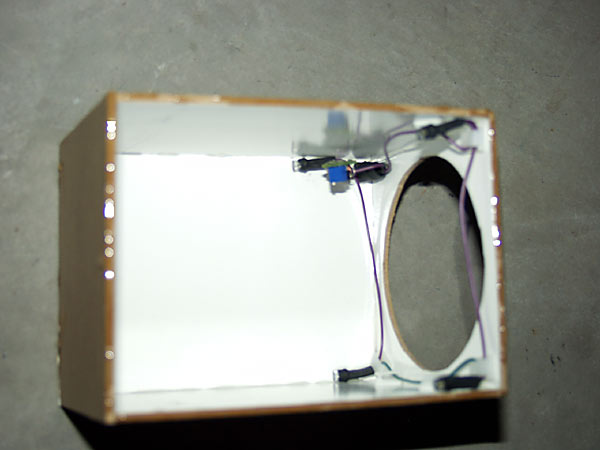
Lights Installed
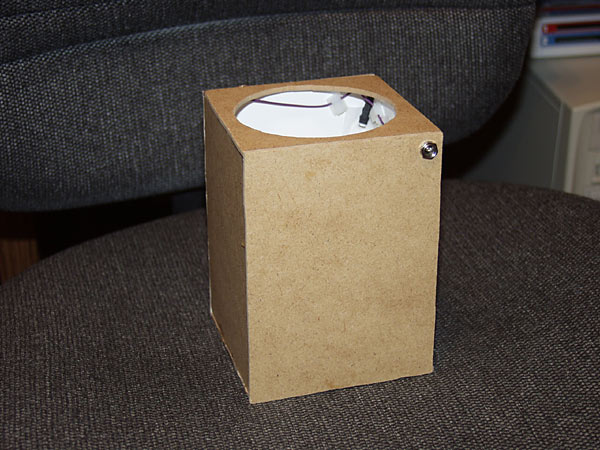
Light Box almost complete
Light Box Complete

Light Box installed on refractor. White shower cap can be placed on first but is not needed. It just helps if the light is too bright for your system.

Light Box at night looking into it. The small light outside is a few tiny cracks on the top. The sides have no light coming out.
|
|
|
Refractor Tips for CCD Imaging
I am currently using a TeleVue TV Refractor at F/5 to do some of my CCD images. Below is what I have found out about refractors in general. I do not have these problems too much any more using the TV 76, other than using an IR blocking filter.
|
|
IR Blocking Just about all refractors and lenes cannot focus IR. So an IR blocking filter is needed to get better focus when taking the luminance part of your image. When I was using an older refractor for CCD images, I was notice that the stars were large and fuzzy. So I picked up an IR Blocking filter and what a difference that made. You need to weigh the cost of using this filter because it will block about 40% of the light coming in. However, all you need to do is take a longer exposure. You be the judge, take a test image of some star cluster with an IR blocking filter and one without. If you think you can get away of not using an IR blocking filter, then you will be better off. I generally do not use an IR blcoking filter when shooting an object with little IR such the Andromeda Galaxy. However, with objects like the North American Nebula with lots of IR, I use one. UV Blocking
I got into color CCD images around August 2001 and was running into another problem. I notice small blue halos in my images which seem to be caused when I used the blue filter. I was in perfect focus so that was not the problem. However, the blue halos continued and I had to use software to remove them.
I got some advice from some experts that seems to have solved this problem. They told me to use a UV blocking filter because refractors seem to have trouble focusing UV. So I did a test shot of M45 before the filter and after the filter was attached. I used the same telescope and CCD camera at the same temperature. The results are below, need I say more.
Newer refractors may not have this problem such as my TV 76, but lenes do.
Both images were just a RGB combine and a debloomer used to help reduce the blooming. Both images were taken at the ratio:
RED 2x8
GREEN 2x8
BLUE 3x8
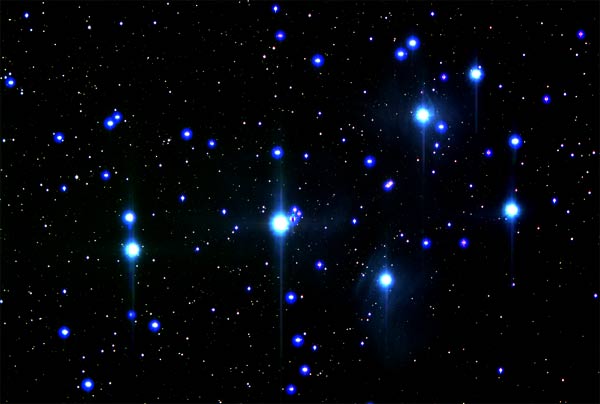
The above is M45 without the UV Blocking filter
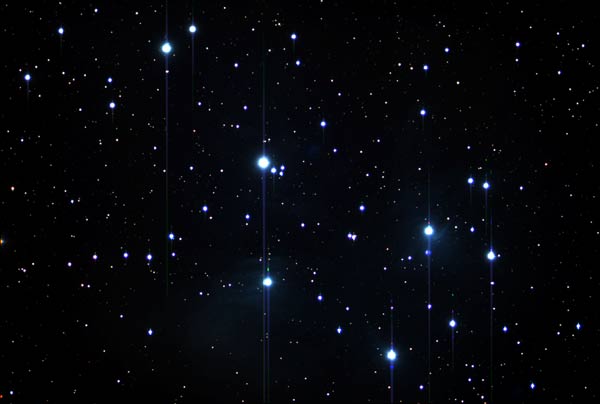
The above is M45 with the UV Blocking filter
|
|
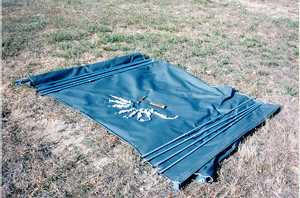
Wind Guard
When I was in Oklahoma, wind was a major problem. I came up with this simple idea on how to block the wind.
When I got the MakNewt 8" in 2004, I made my Wind Guard a bit smaller by cutting off 8 feet and only using 3 poles to stand it up on.
|
|

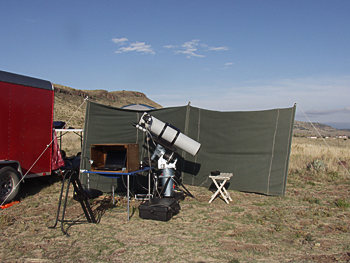
You can see how strong the wind is in this photograph by the bowing of the Windguard, but I was still able to take pictures all night.
|
The year 2000 marked the 25th anniversary of my taking pictures of the sky. In order to take successful photographs you need a good tracking telescope, clear dark skies, light or no dew, and no wind. Since it is impossible to control the weather, you can only photograph if conditions are perfect (unless, of course, you devise a way to get around moisture or wind). Dew heaters have been available for some time now, and they do an excellent job of keeping moisture from forming on your optics or eyepieces. These heaters require little power to run and are inexpensive to buy. However, there is no inexpensive way to fight the other major problem-wind. Today you can purchase domes or tents that are easy to set up and they do protect you from the wind. However, they usually cost several hundred dollars.
One day, as I was thinking about what I could do to block the wind, I could not come up with a solution that would cost less than a hundred dollars. Building something to completely surround you just could not be done without spending quite a bit of money. Then I came up with the idea that maybe you don't have to be completely surrounded. Wind usually comes from one of four directions: north, south, east, or west. West and east winds are usually light. It is the northwest, northeast, southwest, south, and southeast winds that are the troublemakers. This is because they are usually strong and gusty. When a cold front passes through, the winds shift from the south to the northwest during an approaching storm. It is rare to have a south wind shift to the northwest during a dark new moon clear night and only happens when a dry cold front passes by. I have felt a wind shift like that only a few times when I was out with my telescope.
|
|
With this in mind, I decided all I would need is a structure that would be easy to put up and have three walls. The middle wall would face the wind while the two outer walls would defend against wind from the other two directions. You need to have three walls to really do the job because a south wind for example can have gusts from the east and west, but never from the north. If only one side was blocked, it would not work very well.
An old canopy I found laying around in the garage gave me the idea of how to keep the cost down. All I would need to do is get some material and use the poles that came with the canopy to hold it together. The key to making this all work is knowing what kind of material to purchase and how to assemble it. The canopy I have is made of plastic and is usually placed overhead. I realized that this material was too lightweight to use. Since winds have strong gusts, I knew that the material needed to be heavier. A heavy-duty canvas material was the obvious choice because it was durable and strong and at the same time not too heavy to carry. With my 10-inch telescope, a six-foot wall was plenty. I wanted each wall to be eight feet long. The end goal was to have one solid piece that is six feet high and twenty-four feet long.
|
|
|
|
We started off with 5 of these pieces to
put the 24-foot wall together.
|
This is all the things required to put
up the Windguard
|
|
|
|
|
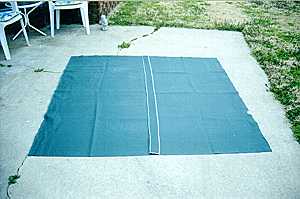
Most material from any fabric store comes in either 45" or 60" width which was not wide enough. So my wife ended up getting five six by six foot pieces. The fifth piece was needed later at the end of the project. To begin with, a surger was used to strengthen all of the edges and keep them from fraying. This step is not required but makes the job a lot easier. Without it, you would need to do a hem or a zigzag stitch on all the edges. She then sewed the pieces together using a regular sewing machine. A heavy-duty machine would make the task easier but it is not necessary. She used a heavy-duty thread as well as a denim needle and just a regular straight stitch at the smallest stitch length to stitch it all together. However, in order to make the pieces more secure, she doubled the material over and sewed two lines of stitching, similar to what you see running down the side of a pair of sturdy denim jeans. Once all of the pieces were sewn together, we had one six by twenty-four foot piece. Please keep in mind that I have chosen this size of a Windguard to fit the size of my telescope. However, you can make modifications to this to fit your own needs.
Now the fifth piece comes into play. I needed a way to hold the wall up and to make it solid. My wife cut four strips about 4-inches wide and six feet long. It is important to note that your strips need to be wide enough so that after you sew them on there is enough room to slide the pole through it. (If you use the poles suggested later, the sizes given here will be sufficient. However, if you are using poles you already have then you will need to adjust your measurements. Be forewarned, however, that the poles that come with the plastic canopies are not strong enough and break easily at the first touch of a strong wind.) Before sewing the strips on the windbreaker, she simply cut the tops off the plastic canopy that had the grommet on it through which the plastic topped part of the poles slides. This needs to be a long enough strip, about 5-inches long and 4 inches wide including the ring, in order to make it secure. Then each of the small strips that were cut from the canopy was sewn to each of the six-foot strips using a zigzag stitch. They were sewn so that just the part with the ring would show at the top.
Next, the four six-foot strips were sewn onto the wall in four places. The first strip was sewn at one end of the wall, the second 8 feet from the edge, the third at the next 8-foot interval, and the last one at the other end of the wall. It is very important that these strips are sewn on very strong. Again, using a double stitch as was used in sewing the pieces together ensured that the material would not be torn apart by strong winds.
The last thing to make is loops at the bottom of the Windguard to put your tent stakes through. This is simply a two-inch by four-inch strip. You begin by folding the two-inch sides over once so that the edges touch each other. Then stitch them down. Next, fold it in half stitching it together again leaving you with a half inch strip. This strip is then sewn to the bottom of the wall forming the loop. Only two per side is needed to do the job so you need a total of six pieces. These aid in keeping the wind from pushing too much on the wall.
|
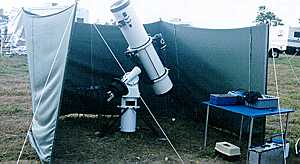
This is how the Windguard is setup.
|
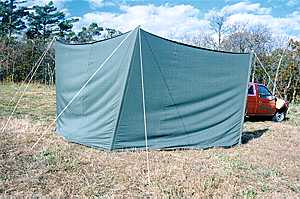
This is the rear view of the Windguard. The ropes used came from the canopy.
|
|
|
|
|
You will need to purchase only a few more items to complete your Windguard. You will need sixteen heavy-duty stakes to use as tent steaks and four 6-foot long electric conduit poles ½" diameter. I had to purchase 12-foot poles and cut them in half. In addition, you will need rope with which to secure the Windguard to the ground. I used the rope that came with the plastic canopy.
|
|
Mosaics using CCD Stack
Download the PDF version of this article.
Download the TIFF files to make a B&W mosaic.
Since I plan to do mosaics, and with help from Stan Moore who developed the software, I came up with a way of doing Tri-Color Mosaics and to get perfect registration using CCD Stack ( http://www.ccdware.com). The hard part with color mosaics is not creating a single red, green, or blue image from the mosaic frames, but getting all the colors registered during the assembling of the mosaic. Black and White mosaics alone take time to assemble, but color is much more difficult. This is something I was not able to do in Photoshop CS because it requires manual rotation which can cause misalignment with each color. By using CCD Stack, I was able to position and rotate as needed to create four (4) registered images per channel that now could be taken into Photoshop without any additional rotation or movement. This was the key to registering the color channels perfectly. Using a simple procedure in Photoshop, the lines and any duplicate or distorted stars were easily removed, not altered or fixed. By removing parts of the layer that created these effects, I was able to restore the true stars that are in the image. This is not a hard procedure to do and is done faster than you would expect depending on the number of frames that make up the mosaic. There is no limit to the size a mosaic, but there may be a limit to computer memory
|
|
Before you start, you need to do the normal process for each frame in the mosaic and for each color. This includes calibration, registration, data reject, and combine. Since this will go to Photoshop, I would suggest Mean combine which has the same S/N as the sum combine but is saved as 16 bit. Once this is done you are ready to start. I would suggest naming the files in the order of making the mosaic. This is mainly to help avoid confusion, and it’s easy to get confused. So for this example, I used the following names:
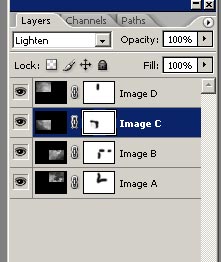
- Red Image A – upper right
- Red Image B – lower right
- Red Image C – lower left
- Red Image D – upper left
This article outlines how to use CCD Stack to create mosaics that are register with each of the sub frames. It also covers how to take these images into Photoshop CS 2 and blend the mosaic into one large image without doing a lot of additional work.
PART A - Building the model
We need to build a model to register the other two colors. So let’s start with red and get those images in position. Once this is done, getting the green and blue images registered for the mosaic is very simple.
Step 1
- Open CCD Stack and the 4 images to make up the red image of the mosaic.
- Now it is time to expand the canvas. Under the Edit menu, choose Expand Canvas. Do not just double the width and height; CCD Stack will think the images are binned and resize them. These images are 1530x1020 pixels, so I will use 3100x2100 as the new size. When you apply the size change, all the images will look smaller and be in the center.
Step 2
- Using Image Manager, select the image just above Red Image A. If this image is on top, then pick the bottom image.
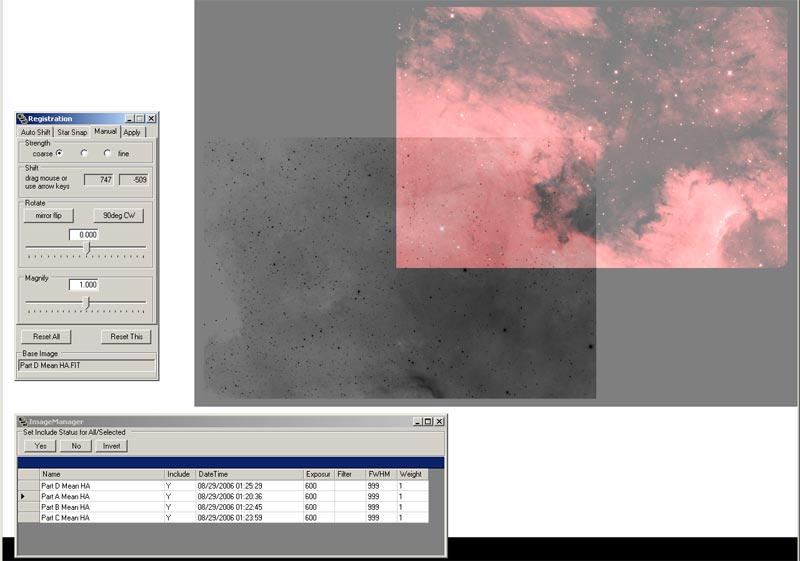
- Choose the Register menu and click the Manual tab. For strength, use Coarse. Move the image with the mouse to the upper right area; this should be red image A. You will see the area above and to the right go out of view. This is normal. The main idea here is to position the image in the upper right corner of the canvas.
- After you have moved it into position, click the Apply tab and Use Nearest Neighbor. Click the button Apply to This, and then close the register dialog. This puts Red Image A in the correct location for the mosaic.
Step 3
- Since we have 4 images, and to avoid confusion, we need to be sure that red Image A is the reference image for the registration, and the one we want to move is Red Image B. So bring up Image manager and change Include to N for Red Image C and D so that they are not included.
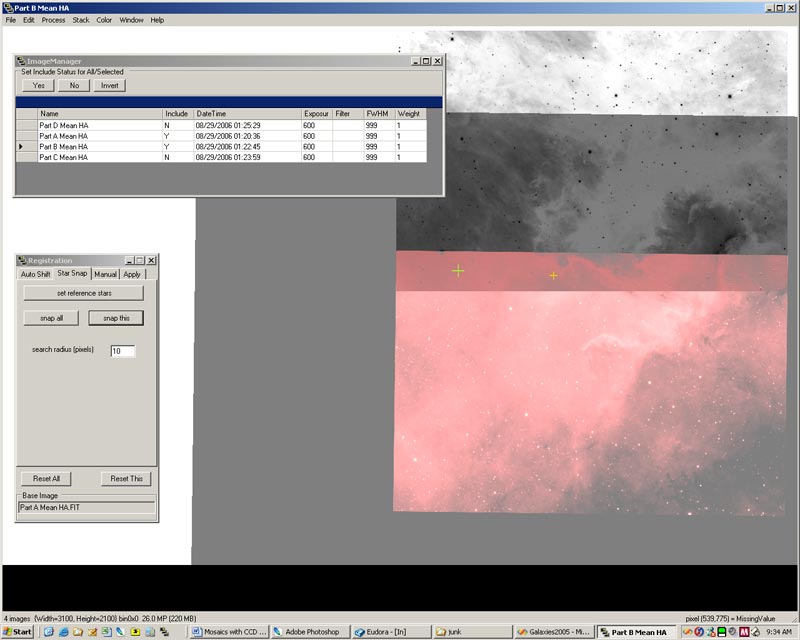
- Now you can select the Red Image A in Image Manager to make it the reference image and click on the register menu. Now move the image, which should be Image B, down to the lower right part of the canvas and get it as close as possible to Red Image A so that the same stars in both images can be registered.
- Use the Star Snap tab, and select 2 or 3 stars that are in both images and use Snap This to lock it into position. You must use stars in both images for this to work.
- Now click the Apply tab and use Bicubic-B Spline, click the Apply To This button. This will place Image B in the lower left corner in the right position.
If you have the CCD IS plug-in, you can use that in place of the star snap because you don't have to align the two images
that carefully. To use CCD IS, just move the image in the area of the other one and use the button Align This. Be sure you have Use High Percision because this will get you
a better alignemnt. Once you have then aligned, then Apply the registeration as you would have done with the Star Snap.
Step 4
- Now we need to repeat Step 3 for Red Image C and D.
- For Red Image C, be sure that Red Image B and C are the only included files in Image Manager. Use Red Image B as the reference, then move and position Red Image C the same way you did in step 3.
- For Red Image D, be sure Red Image C and D are the only included files, and use C as the reference. When you blink the images, you should have your images in the correct position.
Step 5
- Now that the 4 images have been registered and put into the correct position, you should save the FITS Files now using Save All.
- If you want to see the mosaic image now in CCD Stack, use the Combine menu. However, this will also show the lines and possible duplicate or distorted stars. The duplicate stars are caused by rotation in the sky, since the sky is not really flat. When we get to Photoshop, you will see how easy it is to fix the lines and duplicate/distorted stars.
- Note that with additional work in CCD Stack, it is possible fix some of these issues such as the lines and contrast from one image to another. You can use the Blink to jump from one image to another and use Adjust Display as needed.
PART B - The Two Other Colors
Step 1
- We are now ready to register the other colors.
- Close all the images and open the saved Red Image A with the expanded canvas. You should see this image at the upper right corner.
- Next open the Green and Blue Image of the same area of Red Image A
- Make sure Red Image A is the reference image.
- Now move the first image (green or blue) close to Red Image A so that you can register the stars in both. Do not register it yet.
- Next use Image Manager to select the image that you did not move and move that close to Red Image A
- Once that image is moved, use Image Manager to make Red Image A the reference.
- Now that the images are moved, you can register the red, green, and blue images as you would normally do in CCD Stack.
- Save all the FITS images
Step 2
- Repeat Step 1 with the other 3 frames to complete the task.
Step 3
- You are now ready to save the images as Scaled 16 bit TIFF file for Photoshop. Close all opened images. Then open all the images that make up the color mosaic. Use the Save All and choose Scaled 16 Bit TIFF files. You are done with CCD Stack for now.
PART C - Putting All Together
Using PhotoShop CS 2 will make the task of removing contrast lines, duplicate and distorted stars, and adjusting contrast a little easier. However, it is possible to solve all of these issues in CCD Stack in the event you do not have Photoshop CS 2; however, I am assuming you have this software. Photoshop CS or higher supports 16 bit layers, so you really need this, although earlier versions will allow you to do the same thing, but only with 8 bit files. You need to be familiar with the layers pallet and creating and using a layer mask. However, I will tell you briefly how to create and use a layer mask since it is important.
Step 1
- Open the four Red Images to make up the mosaic.
- If you do not see the Layers Pallet, make it visible (Window/Layer menu).
- Select Red Image A and right click on the image in the Layer Pallet and choose Layer From Background. This makes the background image a layer.
- Select and copy Red Image B, and paste it on top of Red Image A.
- Select and copy Red Image C, and paste it on top of Red Image A.
- Select and copy Red Image D, and paste it on top of Red Image A.
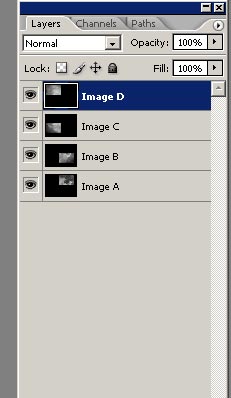
- When you are done, Red Image A should be a bottom layer, B is on top of A, C is on top of B, and D is on top of C.
Step 2
- The layer mode is set for Normal on each of the layers. This will need to be changed to Lighten mode on each layer, and this reveals the mosaic.
- Here you can use Curves or Levels to adjust each layer to get them as close as possible thus removing the lines. What you can’t fix can be done with a layer mask.
- The next step is to create a Layer Mask for each layer. The way to do this is select the layer in the Layer Pallet and select Reveal All. This puts a small box to the right of each layer.
- Set the foreground color to black and the background to white
- To see what the layer mask can do for you, select the Brush tool, and set the size of the brush to a good size. Set the Opacity to 50%. Click inside the white box on the top layer. Now move the brush over the image. It should be erasing the top image and showing the image under it. If you switch the colors so that white is the foreground color, you undo what you erase. (Look in the Photoshop help for more on Layer Mask.)
- By using the layer mask, you can remove the lines, duplicate stars, and distorted stars. The trick is learning how to use the Layer Mask to do the work for you.
Step 3
- Once you have a good clean image, you can Flatten the layers under the Layer menu. Do steps 1 and 2 again for each color. At this point you have 3 TIFF files for the RGB image and can use whatever method you use to make the color image.
I have written this document for those who want to use CCD Stack to create mosaics. What is unique about CCD Stack is that it can create sub frames that make up a mosaic that you can take directly to Photoshop. In this software you can work with each frame on its own by using layers. I have uploaded the 4 combined images so that you can practice assembling the mosaic. Since it is very easy to do green and blue once red is done, I uploaded only the red images. Feel free to contact me via my web site if you have any questions or need additional help with any part of this.
|
Using Registar to resample color for your luminance.
The process that I am about to outline is not new and there are many images out there that
have done this before. I want to use a larger telescope for high resolution
imaging but do not want to really shoot the RGB channels I already have. In
addition I want to make available my RGB FITS files for those that live in a light
pollution sky and getting out to the dark skies is not an easy task these, where you need
to really image the color channels.
|
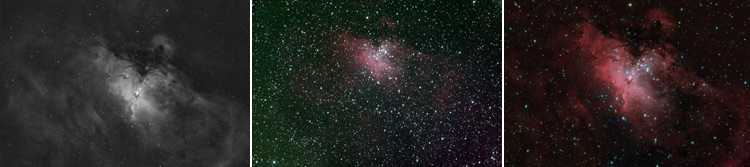
What I will be showing you is how to use Registar to register your red, green, and blue channels
with the H-Alpha image you collected and produce a HA-RGB image. With this example,
I am using a H-Alpha image taken by Rockett Crofford using his STL-11000 and the 12.5 inch F/5
Reflector. The color for this was taken with my Epsilon 180 F/2.8 and the ST-10 CCD
camera with AstroDon color filters. Although you would normally do this with FITS
images that were calibrated, registered, and combined, I am using TIFF files. Therefore
this method works with any graphical image Registar will support. You can download
the demo two images and try it yourself. You can use the demo version of Registar
but you have to register the images one at a time and cannot save them, but you will see how well
the registration will work.
The first step if you are working with a color image is
to split it into the single red, green, and blue channels. You can use Registar to do
this or any other software that does the same thing. The way Registar works best is to
place the images you want to register in one directory and the reference file in the folder you
want to save the registered images. First create a folder called unregistered and copy
the red, green, and blue images to it, which you will have to split if using the demo image. Create another folder called registered and copy
the M16_12.TIF file there. Now open Registar and the version I am using is my copy which
allows me to save the images.
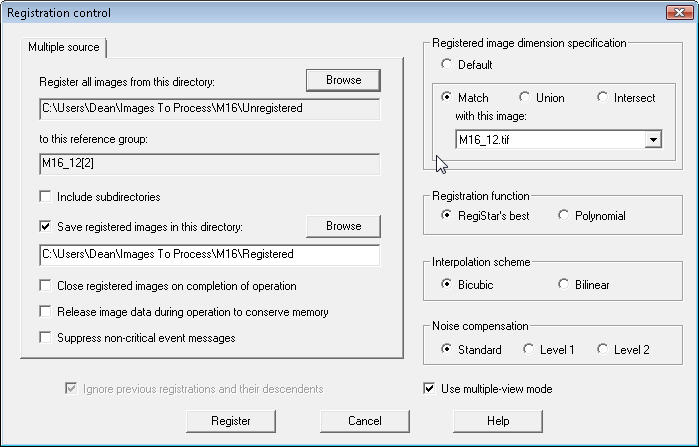
Open the M16_12.TIF file and select the Register menu under
the Operations main menu. This brings up the register dialog and the Multiple Source
choice. (seen below) Use the Browse button to select the unregistered folder where the RGB images
are located. Next check the box for Save Registered Images and browse to the
Registered folder where the registered images will be saved. On the right side of the dialog
choose Match and leave everything else the same. The last step is to click Register.
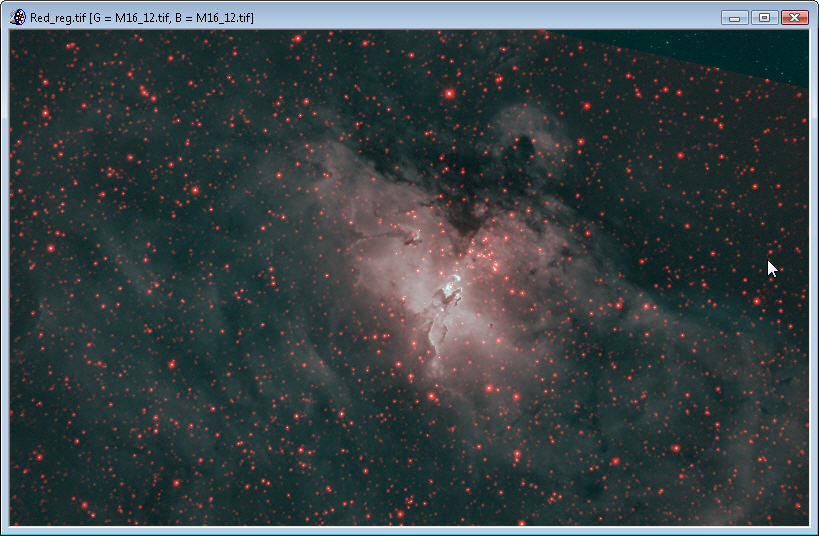
In
the Registered folder you should now have the M16_12 and the each image for the color. You will
notice that some of the image in the new red, green, and blue is not there, this is because
there was no match with the color images with the reference image. Now you can use the new color
images and combine them into a single color image. Then process the M16_12 and RGB as you
normally would.
I wanted to add a side note here about other software. If you own CCD Stack and CCD Inspector from CCDWare, you will also
have a plug in for CCD Stack that was included with version 2 of CCD Inspector call CCDIS.
CCDIS handles different image scales, rotation, flips and offsets Below are some screen captures of the register
dialog and what the imaged looked like after registering and supports a 64 Bit OS.
Therefore, you can download the demo version of this
software and give that a try to see if it works like Registar. CCD Inspector gives was a working demo version where you can save files.
|
|
|